The Best Chocolate Cake You Will Ever Eat


This is the best chocolate cake you will ever eat! It is truly moist, dense and delicious and it is so easy to make from scratch! When I was growing up my mother’s best friend was a baker. This was her recipe.

1 3/4 cups flour
2 cups sugar
3/4 cups cocoa
1 teasp salt
2 teasp baking soda
1 teasp baking powder
2 eggs
1 cup buttermilk or 1 tablesp vinegar in 1 cup of warm milk, soured
1/2 cup oil
1 teasp vanilla
1 cup coffee, plain or flavoured.

I like to use flavoured coffee in this cake and also in the frosting. Usually I use hazelnut vanilla but for this one I used butterscotch coffee, because that is what I had on hand.

Combine all dry ingredients in a large bowl. Add remaining ingredients. Beat with mixer for 2 mins. Pour into two round greased and floured pans or one greased and floured rectangular pan.

The batter will be very runny, but that’s as it should be.

Bake at 350 degrees for 35-40 minutes, just until a toothpick inserted in the center of the cake comes out dry. Do not over bake and make sure it is done!! This will require you to watch the cake carefully for the last few minutes of baking time, occasionally testing it until it is perfect. The key to a truely fabulous cake is to take it out of the oven at exactly the right moment.
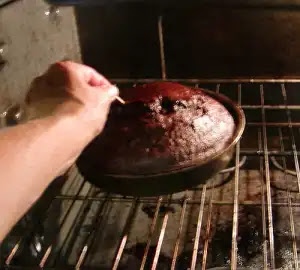

Make certain that your oven is calibrated properly. Most electric ovens get hotter over time so that they are baking at about 375F when you put the dial on 350F.

If you are mechanically inclined you can fool around with the thermostat inside the oven and adjust it in the right direction a tiny bit. We do this when we get another oven or when our oven is obviously too hot. You will need a good digital or oven thermometer to do this and it takes time. Adjust the thermostat in the oven a tiny bit, then turn the oven on until the light goes out. Use the thermometer to test the temperature in the oven when the light goes off, adjusting the oven thermostat slightly, over and over again until you get it exactly right. It could take an entire day to calibrate your oven, but its worth it! It makes a huge difference in baking to have the oven at the right temperature. It should be a few years before it needs it again.

Please don’t ask me for exact details. All ovens are different. Hubby does this and I don’t know exactly how he does it. You can probably find out on the ‘net’.

If you know that your oven bakes hot, you can always just turn it down a smidgen. If you turn it down too far and it is baking too cool, the cake will take longer and dry out before it gets done, so be careful with that. If it bakes too hot the cake will be overdone on the outside before it gets done on the inside.

Also, if you are using a glass dish you should bake at a slightly lower temperature.


When the cake is done and removed from the oven it should cool to room temperature before frosting. I set my pans in very cold water in the sink to cool them quickly. Never, ever frost a cake that is even slightly warm. The frosting melts! You can make a fabulous cake and come back an hour later to find the second layer sliding off and sitting beside the bottom one and the frosting all pooling in the plate! (I found this out the hard way!)

When the cake has cooled completely it is ready to be frosted.

This is how I make frosting. I never use a recipe for it.

Put about 3.5 cups of powdered icing sugar in a large bowl. If making chocolate frosting, put about 1 cup of dry cocoa in with the sugar. Dont use an instant pudding mix in here to make flavoured frosting. It doesn’t dissolve. Jello that has been made and set might work well but I haven’t tried it yet.

Add about a tablespoon of vanilla or other flavour extract unless using cocoa, then you won’t need it, unless you want to add a specific flavour to chocolate frosting, like cherry. You can be creative here.

Add about this much butter.
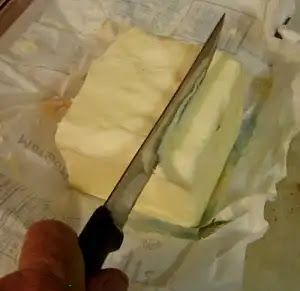

Mix it slowly on low until the butter has been fairly evenly cut into the sugar and you have a dry, lumpy mix. Then add liquid very slowly, a tablespoon or so at a time until the frosting is the right texture. Beat it on high for a few minutes.


You can use any liquid. I use coffee to make the frosting for this cake. The same coffee that I put in the cake. The flavoured coffee makes especially good frosting.

I sometimes make an orange cake, using fresh orange juice to make a white cake and using fresh orange juice to make the frosting. Carrot juice in the frosting for a carrot cake?

If you put too much liquid in the frosting, just add a bit more sugar and mix again. Add only a tiny amount of sugar or liquid at a time until the frosting is the right texture. Aim for a little too stiff as opposed to a little too soft. The frosted cake will hold together better with a stiffer frosting but it will slide if the frosting is too soft.

If you made a layer cake you will need to cut the top off of the bottom layer, making it flat. Otherwise the finished cake will be slanted. 

After cutting off the top of the bottom layer, spread frosting on it carefully. You don’t want to tear up the cake without a top on it to protect it. Set the other layer on top of this frosted one and continue to frost the top and sides of the cake.


I like to drizzle some melted hard chocolate on the top of a chocolate cake and sometimes other cakes, as well. I buy chocolate Easter bunnies on sale after Easter, chop them and put them in the freezer for this purpose. If they are chopped up and frozen other people don’t eat them.


When I am making the frosting I melt about 1/3 of a bunny (You will have to use your judgement here) in a glass measuring cup that I have put in a small pot of water on the stove. I add a few drops of oil to it while it is melting to make it smooth. You will also need to stir it a lot and watch it carefully. As soon as it melts, turn the heat off.


When the cake is frosted you can drizzle the chocolate in lines across the top or dot it on. You can also make chocolate leaves with it. If you are going to make chocolate leaves, don’t put much oil in the chocolate while it is melting. You want it to get really hard when it cools.

To make chocolate leaves you will need some clean leaves from the garden to use as a mold. Paint the melted chocolate onto the leaf tops and let them cool until they get hard. Peel the leaf off the bottom. This should leave you with a chocolate leaf you can arrange on the top of the cake. I don’t usually have the time to do this.


This cake is especially good with handmade, chemical free black cherry wine! You can even use this in the cake instead of coffee. You can put it in the frosting too, if no children are eating it. The frosting doesn’t get heated so all the alcohol will remain in the frosting to be eaten. (Warn people before they eat it!)


If you keep an apple in the container with a cake, it will help to keep it moist.

Its not a miracle worker, however. If you don’t keep the cake well sealed, it will still dry out.

Most cakes freeze well, too, if sealed properly. Freeze half of it if you don’t think it will be eaten in a week.

Make your own yogurt


My Yogurt Maker
You can make your own yogurt at home. The most common yogurt makers are electric and have little cups that the yogurt is made in. I always thought that little bit of yogurt would be more trouble than it was worth. I bought a non-electric yogurt maker that holds two litres of yogurt and it works great! For the same amount of trouble and time, I can make a lot more yogurt. This type of yogurt maker is called a "Yogotherm" and can be bought many places online. 


If you want thick "Greek" yogurt, you would make it by the recipe below, then drain it in cheesecloth until it's as thick as you want it to be. You could even drain it enough to make cream cheese! (See my post on "Making Your Own Cream Cheese".)


Below is the recipe I use to make yogurt. It doesn't hurt to bring the milk to a boil. I have read that it even helps make it thicker. It's the cooling down temperature that's important. If you add the starter yogurt when the milk it too hot, it will kill the bacteria that makes the yogurt. I always use a little yogurt as the added starter for next time. You can use a bit saved from your last batch, for awhile. After a few batches, you should buy new starter yogurt or yogurt starter in powdered form. I just buy a little container, even if it's sweetened fruit yogurt. The very little ones that are only a few bites, are enough starter. If you can find it plain, that's even better. The yogurt you make will be totally unsweetened, of course. You can add whatever you like to the yogurt before you put it in the maker, but I would be careful not to add anything that's going to hinder the growth of the bacteria. 
 

If you don't want it to separate a lot and aren't making cheese with it, the addition of a couple of tablespoons of plain gelatin will help keep it solid longer. (Dissolve the gelatin in a little boiling milk or water before adding it.) Less whey to drain off each time before you eat it. It will still water a little, but not nearly as much. I don't do this anymore, as I like to drain the whey off to make very thick "Greek" yogurt or cream cheese. 
 
To Make Yogurt:  
 
Ingredients & Equipment
  • Milk: 1 quart (or 1/2 gallon) of whole, 2%, or skim milk.
  • Starter: 2–3 tablespoons of plain yogurt containing "live and active cultures" per quart of milk, or a freeze-dried starter culture.
  • Equipment: Pot with lid, thermometer, whisk, and jars or a container for incubation. 
Step-by-Step Instructions
  1. Heat the Milk (Scald): Pour milk into a pot and slowly heat to 180°F–190°F (82°C–88°C). This kills wild bacteria and denatures the whey proteins for a thicker, smoother texture
    .
  2. Cool the Milk: Remove from heat and let it cool down to 110°F–115°F (43°C–46°C). You can speed this up by placing the pot in an ice-water bath. If you don't have a thermometer, it should feel pleasantly warm (not scalding) to your finger for 10 seconds.
  3. Add the Starter: In a small bowl, whisk the yogurt starter with a small amount of the warm milk until smooth. Pour this mixture back into the main pot and stir gently to combine.
  4. Incubate: Cover the container and keep it warm (around 110°F) for 6–12 hours.
    • Methods: Use a yogurt maker, the "Yogurt" setting on an Instant Pot, a slow cooker, or put the jar in the oven with the light turned on.
    • Note: The longer it incubates, the firmer and tangier it becomes. I usually let it sit overnight, about 8-10 hours.
  5. Chill: Once set, transfer the yogurt to the refrigerator and chill for at least 4 hours before eating. 
How to Make Greek Yogurt
To make thick Greek-style yogurt, line a fine-mesh strainer with cheesecloth or a large coffee filter, place it over a bowl, and pour the set yogurt into it. Let it drain in the refrigerator for 2–8 hours to reach your desired consistency. 
Tips for Success
  • Save for Next Time: Reserve 1/4 cup of your homemade yogurt to use as the starter for your next batch.
  • Avoid Over-stirring, moving or any agitation during incubation: Too much agitation during the setting process can make the yogurt runny.

Pastry

 PASTRY

This is an unusual pastry recipe. I have never talked with anyone who uses a
recipe like this one. It is an "easy, no-fail" pastry recipe. It makes 5-6 single pastries, so we freeze some in single pastry balls.
If you heat one of these frozen balls in the microwave on high, forgetting to put it on a lower level to thaw, it will melt into a liquid. If you then put it back into the fridge until it is firm and roll it out to use as regular pastry, it will have "failed" and will be tough and unusable. ("How do I know this?" you ask. Well, uh, hmmmm. I just do and that's all I'm saying!)

Pastry Recipe:

5 cups flour
4 tablespoons brown sugar
1/2 teaspoon baking powder
1/2 teaspoon salt
1 lb lard or shortening
1 egg
1 tablespoon vinegar
3/4 cup milk, approximately

In a large bowl, mix dry ingredients together until well blended. Cut in fat with pastry blender, leaving it fairly rough and not totally mixed, sort of like baby peas in flour.
In a measuring cup mix together vinegar, egg and add enough milk to make 1 cup of liquid. Add wet ingredients slowly to dry ones, stirring as gently and as little as possible. It is these tiny, unmixed pieces of fat that make the flakes in the baked pastry, so you want to keep them intact and not make it any smoother than you have to while working it and rolling it out. It will take a bit of work with floured hands to get it into a cohesive dough that can be rolled. Do not add more liquid, just take the time to gently knead it with your hands until it is blended enough. It will form a good dough when mixed enough. Do not use a food processor for this or you will end up with hard bread, not pastry.
Divide this dough into five equal balls. Use one ball for one pastry. If making a pie with a pastry top, use another pastry ball for the top. Keep the trimmings, as the trimmings from all five balls should make a good sixth pastry, if gently handled. If you want to do this, don't use the left over pastry for little turnovers filled with jam. Put each ball into a small freezer bag and freeze until needed. Take out the day before to thaw. Keep refrigerated until needed. (Microwave thawing is not recommended as it is too uneven.)
Heavily flour a flat surface for rolling. This is not a cake. You can mix as much flour into it as you need to and it won't affect the outcome. Pastry is meant to be dry. So use a lot of flour and it won't stick to the rolling surface. Another trick to keep it from sticking while you roll it is to keep it moving. Turn the circle continuously while also adding more flour underneath as needed. If you are rolling and it feels like it might be starting to stick in one area, gently lift that corner, add more flour and turn the dough to spread out the flour under it.
If the dough starts to crack while rolling it, roll it in the other direction, leaving that crack on the outside edge. Watch the dough carefully while rolling to prevent large uneven cracks and keep it turning. When you have a ball rolled out that is the right size for your pie tin, roll it up onto the rolling pin. Lift pin and dough onto the pie tin and unroll in place. Trim edges around outside of pie tin, with about 1/2" left over outside edge. When the top pastry is added, fold this extra edge over the top and seal with water and a fork.

This pastry can also be used for turnovers, apple dumplings, etc. etc. It's just very good pastry.
Fruit And Berry Pie Filling:
Measure how much your pie tin will hold by filling it with water and pouring that water into a easuring cup. Most 9" pie plates will hold about 4 cups of filling.
Wash, peel, core, pit, seed, chop and generally prepare fruit and berries as you would for pie. Make enough berries to fill your pie tin, measured as above. Add from 4-8 tablespoons of flour depending on how watery this particular cooked fruit/berry usually is. Add 1-2 cups of sugar depending on the tartness of this fruit/berry and how tart you like your pies. (Any type of berry will usually need the full 2 cups.) Stir together in pot on stove and bring to a boil before adding to
pastry. Do you often find that you have to overcook the pastry to get the filling completely done? This step will avoid that. You can even cook it halfway before putting it in the pastry. Don't add cold filling to a pastry shell and expect it to cook before the pastry burns.

If you are pre-baking the pastry shell for a custard type filling, bake it full of dried peas to keep it from losing shape in the oven.

Optional ingredients:

- 1/2 teaspoon cinnamon - always add this to apple pies.
- REAL butter in small bits under top pastry (Please people, use real butter here. It's PIE, after all. What's a few more calories...)
- Small amount of sweetened, condensed milk for creaminess or REAL cream (see
"butter" above.)
- Nuts or shelled sunflower seeds
- Raisins - good with apples and nuts
- Pineapple (What goes well with Pineapple?)
I think a pie made with a mix of cherries and blueberries, with chopped walnuts would be Heavenly! Why don't people put nuts in pies? Or chocolate chips. What's wrong with chocolate chips in a fruit pie? You can just add them on top under the crust, after you put in the hot filling. They would certainly go well baked with bananas. Has anyone ever made a hot banana pie - probably not. Hot fudge pie is certainly delicious, as is butterscotch pie!

Making Tallow


I use tallow to make soap, as well s for cooking. Beef fat is called tallow, pork fat is called lard - prepared in exactly the same way. Tallow is harder than any other common fat and will make a harder soap. Shortening can be used to make vegan soap but the soap won't be as hard as that made with beef fat.

I picked up some beef fat scraps from a butcher nearby and have put them into a pot to render. Rendering is cooking the fat scraps until all the fat has been liquefied, straining it and letting it cool and harden. This separates the fat from other impurities. The fat rises to the top and can be taken off in one hard chunk after it cools. The fat will simmer slowly in this pot for awhile, until I am satisfied that it has cooked long enough.

When it is finished I will strain it through a colander, then through a fine strainer before letting it cool outside on the front porch. If you are cooling it outside, a lid is important. Otherwise you might find little racoon prints in it or you might even find it completely gone! The smell will draw the surrounding animals. I will leave it there throughout the day and bring it in at night. The next morning it will look like this in the pot.


Now that it has cooled I can separate the fat and give the rest to the chickens. They will love it! This is the bottom layer under the pure fat. You will need to make sure none of these impurities get into the tallow.

While the fat simmers, I will go through the rest of my things and make sure I have everything I need to make soap. Tomorrow is a holiday, after all, and there will be nowhere open to buy ingredients.

This is the pure tallow. Isn't it beautiful! It looks just like lard or shortening from the store!

If you have especially smelly fat to render, the addition of a potato to the simmering pot will help to remove odors. A few teaspoons of white vinegar will also help remove odors from the fat.

It can be boiled twice if it is not clean and pure enough the first time. A tablespoon of salt added to the boil will help make it cleaner.

Too Many Sweet Bell Peppers


I got these peppers at the grocery store, all in one large bag marked down. They do this sometimes when they have produce that's not selling. It's usually bananas, but yesterday it was bell peppers. I grabbed two bags and was lucky to get thoese. Other women were grabbing at the basket too. 


I wanted these for drying. It's an experiement I have wanted to do for along time so, since I got these cheap, I tried it today. I have seen photos of apple rings drying on a stick or a string across a window and have often though, "I wonder if that would work for peppers...hmmmmmm...". I'm trying it in my window, as well as in the oven. 


I sliced them all into thin rings, trying to keep them similar thicknesses. I hung most of the rings on the wooden chopsticks and put them in the oven on "Keep Warm". I think it may be too hot, sitting at 170f. Drying temperature is quite a bit cooler but it's all I have, so I used it. 


I put the rest of the rings in the window on a small wooden piece of dowel I had hanging around. I washed it first, of ocurse. I used a Farmer's Market display thing to hold it. (I have a LOT of Farmer's Market displays I have made in the past few years, just hanging around in the garage.)


The little pieces got chopped up and spread out of paper towels to dry. I have dried a lot of seeds and herbs this way in the past years, so I'm trying it with peppers. 

I kept the peppers in the oven for hours. I turned it off from time to time and just left them in there to dry. It works for meringue kisses...


When I took them out to roast a chicken in the oven, they were still not quite crispy dry, so I just put them on my resin counter top to finish drying. They look kind of shriveled and dark. I think they look okay and they have gotten dryer and crispier over the evening. I may still leave them out until morning, just to make sure they are dry enough. Then crush them into a glass jar. Do they look okay? Too dark? What do you think? They look kind of overcooked to me, maybe "roasted"?

They don't look very appetizing, but then something dried never does. They sure do smell good! Very much like green bell peppers. Well, I don't think I'll do the oven thing again. I may stick with drying rings on a stick or a string in a sunny window.


Drying things in a vehicle on a sunny day works well too. I've done herbs like that. The truck smells wonderful on those days! ("Stinky!" is what hubby calls it...)

I'll post again with the results of the pepper rings on the stick in the sunny window, when they are ready.

We get our motorhome back from the garage on Saturday. I'll have to find a spot for drying things in there when we hit the road. 


Making Fruit Pies Without a Recipe


All through my youth, I thought a recipe was necessary to make a pies. If I came across fruit or berries on sale, I would first have to find a recipe for that particular one before I could make a pie with it. After years of practice I have hit on a method that works for me.
Pastry is easy with the directions on my "Pastry" post.

It is the filling I had trouble with until I developed this simple system.

Pie filling is basically prepared fruit and/or berries plus sugar and flour. You will need about 8 cups of prepared fruit that is washed, hulled, cleaned, cored, peeled and ready to put into the pie. The flour is to thicken it so you don't have runny pies and the sugar is purely for taste.

How much of each depends on your filling. You be the judge of how sweet you want it. I use 1 to 2 cups of sugar for every standard 9" pie made with fruit or berries. I put 1.5 cups of sugar in a blueberry pie.

How much flour depends on how juicy the filling is. Again you have to judge the juciness. I use between 4 and 6 tablespoons of flour for every standard 9" pie. Where the juciness is concerned, I find it is better to use a little more than too little. No one likes a runny pie. You cannot judge how runny it is while it is very hot, however. Let it cool to just warm before making that judgement and adjusting the amount in the next one or the cooking time. If you have put in the 6 tablespoons of flour and it is runny, you probably haven't cooked it long enough.


You can bake the filling in a pie without burning the crust if you cover the entire pie with aluminum foil. If the pastry is getting dark and the filling is not done, cover the entire pie and bake longer.

If your most common problem in pie making is getting the filling completely cooked so that the fruit is soft and the juice is thickened but the pastry is not yet burned, try heating the filling up to the boiling point before your put it into the pastry. Only do this if it is going directly into the oven. The boiling filling will melt the fat in the pastry if you let it sit long like that without baking.

Today I made four blueberry pies. I found frozen whole blueberries at Costco for a good price. I made the pastry yesterday. I baked one and put the other three in the freezer.

Pies taste just as good after freezing as they do fresh if they are frozen BEFORE THEY ARE BAKED. The quality suffers a lot if you freeze fruit and berry pies after baking. The filling will be fine but the pastry will be soggy.

Another tip: Do not keep fruit or berry pies in the refrigerator. This will also make the pastry soggy. I cover mine with plastic wrap and keep it on the counter or on top of the fridge.

Thank goodness cats don't eat fruit pie! He might be tempted to eat squash pie with all the eggs in it, but those go in the fridge.

He is sleeping in a kitchen chair. His usual perch when I am in the kitchen working, is on the corner of the table, watching me. Yes, my cat sits on the table. We don't actually EAT on the kitchen table. (Does anyone?)
With these easy directions you can make pie out of anything. You can mix the filling as in peach/pecan or apple/maple/walnut with caramel drizzed on top. Use your imagination. If you have some fruit, but not quite enough, add some nuts and raisins to it. Use roasted hulled sunflower seeds in place of nuts in a pie. No one will know they are not nuts. You might also try substituting a little of the flour in the pastry with finely ground pecans. You can top the filling with bits of butter before putting the pastry on top. There are many, many variations you can make with this simple system for pie filling.

Bavarian Jello


I call this "Bavarian" jello because that is what I heard it called when I was a kid. It's flavoured jelly powder (Jello) mixed with whipped cream and it's delicious.

It is a quick, easy, frugal yet fancy dessert. I make it a lot in the summer in the heat but also now, when strawberries are on sale at the store. (Next year we will have our own strawberries in the freezer! - Next year we will be drowning in strawberries!!)

To make Bavarian jello you make up a jelly powder box according to the directions on the box. Mix one package with 1 cup of boiling water. This is easy when you keep a kettle on the woodstove. I always have boiling water on tap :-)

Stir it until it is dissolved. Then add 1 cup of cold water. I put chopped ice in the 1 cup measure before I add the cold water. It makes the jelly powder "set" more quickly.

When it is almost set, or half set, use an electric mixer and beat it with whipped cream. Put into whatever container you want to use and put it in the refrigerator. It will harden in a few hours.

I like to layer it with clear jelly powder and fruit in glasses. I used tumblers this time, as it was just a special dessert for hubby and not for company. If I am making it for company, I use the stemmed wine glasses.


This one pictured is strawberry. I made up one box of strawberry jelly powder and left it clear. When it was set I spooned it into the glasses along with some fresh strawberry pieces. I then spooned in the Bavarian jello with whipped cream. I saved some whipped cream to put on top too, and a few fresh strawberries for the top, as well.

You can make any flavour that you like. Raspberry is great, as is cherry! Raspberry chocolate would be dreamy! I haven't tried it yet. If you do, let me know how it is!

When you are finished with your glass, you can then give it to the dog to clean out. Buck prewashes all of our dishes and he loves dessert of any kind!

It went over well! There's nothing like a special summery dessert to brighten up those dull, gray winter days!

I also made a fresh strawberry cake with another of my mother's cake recipes. It's fabulous! I'll post that recipe soon!